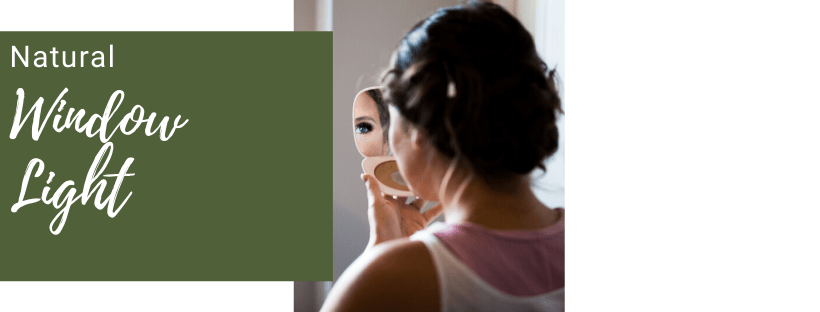
How to use natural window light to compose a high quality image
To take pictures using NATURAL WINDOW LIGHT, you need to familiarize yourself with the different effects you will get depending on how you position yourself. If your subject faces the window straight on, they will have a brightly highlighted face. You have to be careful because the face might end up being washed out and you will loose a lot of details, but you can play with it for a fun effect. If the window is on one side of your subject, one of the sides of their face will be in the shadows and the other side will be really bright, you will get a fairly high contrast, maybe some details in the shadows will be too dark to see on the image, but that is fine as it can add interest to your photo.
The way to get the softest result is to keep the person backlit. You have to be a little careful with a phone since it might try to expose for the bright window and end up underexposing your subject. You want to make sure to click on the face on the screen so that it adjusts to the darker area of what you are photographing. You can also try a 45 degree angle from the window instead of directly across from it. A point and shoot camera should be able to adjust, but you can also try positioning yourself higher than your subject and shooting down on them. When my subject has their back to the window, I like reflecting some of the light back onto their face using a reflector, but any kind of white surface would do the same. You can have someone else hold a white sheet up and voilà! It just helps keep faces a little more highlighted which is very nice when they are not facing the light.
The other thing you want to pay attention to is ambient light. A lot of light bulbs have a yellow tint (warm colour) and will change the tone of your photo and might also create unwanted hot spots on people’s faces. It might not always be possible, but if it is bright enough in the room where I am working, I prefer to turn off all other lights.
Shooting with natural window light creates some really beautiful effects so there isn’t one right way of doing it, but understanding what you are creating will help you have better control over your final product.

How to photograph people during the golden hour
If you have ever heard a photographer gushing over how much they love the GOLDEN HOUR, well they are referring to that time of the day when the sun is about to set over the horizon and creates this ridiculously angelic gold halo around people when you photograph them. It is gorgeous and there is a reason why I like booking sessions late in the evening!
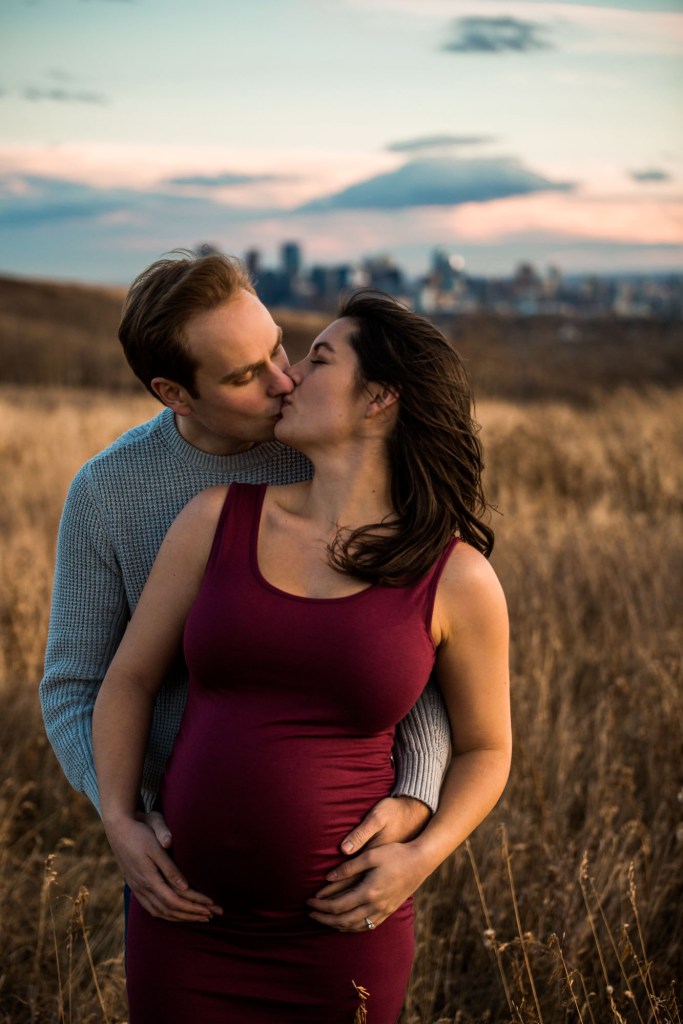
The picture above is actually sort of backwards from how you would typically shoot during golden hour but I wanted to use this to show you that when it comes to light, the most important thing is to understand how it is going to affect your image. I touched on that while talking about natural window light and the same is true here.
You would typically want to keep the sun behind your subject and you facing the sun which will give you a halo effect. You will have to point your phone or camera at the people you are photographing and wiggle it around slightly until you find the sweet spot where you get just enough flare from the sun but you don’t completely overexpose your image or hide faces. This is a case of trial and error. Take multiple photos of the same thing at slightly different angles until you find the one that looks the best.
In this case, I wanted to capture the rainbow. I could have placed them both with their backs to the sun so the light would be softer, but the sun was just about to go over the horizon, it was really really low and it was just enough to soften the contrast. So again, this is about experimenting.
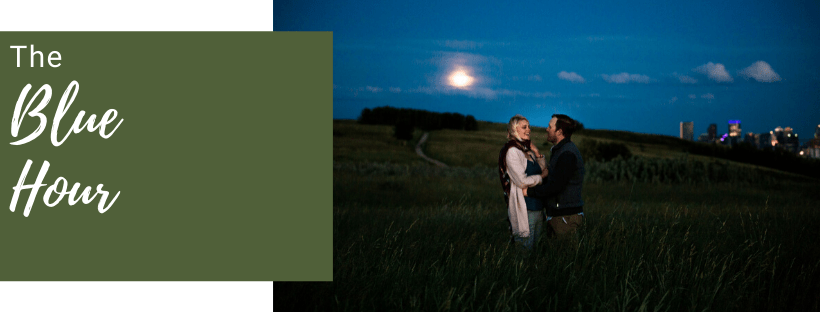
How to photograph people during the blue hour
Golden hour is a term that you might have heard before, but have you heard of the BLUE HOUR? If I had to pick a favourite, I think that I would go for the blue hour. It is the time of the day just after the sun has set over the horizon when the last bit of light is left in the sky. That is when you will get the soft pinks and really dark blues. And the tone is absolutely stunning. Softer than any other time of the day, but there is still enough ambient light that you might not need a flash quite yet. This one might be a little harder to work with if you don’t have a DSLR camera since the range of higher end cameras will allow you to brighten up the shadows and darken the highlights and somehow manage to pull ALL of the gorgeous colours that come with the blue hour.
But you can still make it work even if you don’t have an expensive camera. What you want to think about most while shooting during the blue hour is exposing for the sky – if your subject is bright and clear on your photo, your sky will most likely be way too bright and you will loose all of the pretty colours. With entry level cameras and phones, the best way to avoid that is by taking a picture with a brightness that is suitable for the sky and using a flash to light your subject.
Extra pointer, if you go camping and sit by the fire, it might be your best bet at capturing all of the beauty of the blue hour as the fire might give you just enough light to see your subject without having to use a flash and the pretty bright orange flames always look so good in the moody blue light at dusk.

How can the ISO help you expose your image correctly
The ISO is one of the three factors that need to be adjusted to properly expose your image, along with the shutter speed and aperture. The aperture is how big the opening that lets the light in is, the shutter speed is how long that opening stays open for. The ISO dictates the light sensitivity of your sensor. The sensor is the part of the camera that the light draws on – basically what captures the image.
Some commonly used ISO’s are 100, 200, and 400 on the low end – the ones you use when there is a lot of light. Then it starts going up to 800, 1600, 2000, 3200, etc. – the ones you want to use in low light settings so your sensor is set to be more sensitive to light and therefore captures more of the small amounts of available light and details.
If you double your ISO, for example from 100 to 200, you double your exposure, double the light sensitivity. The same would happen from 1600 to 3200. Although it sounds like a bigger jump, it again allows you to double your exposure.
The biggest issue with high ISO’s is that they come with noise. Noise is a grainy effect, the lines become a little less sharp and the textures less smooth. You can use that to your advantage and create some really interesting finishes on your images. But there is typically a point where even if the device technically allows you to capture the dark scene, it just becomes way too grainy and unpleasant.
I have experienced that first hand with my older camera, the one I started out with. I loved that camera, it was a great starter, but it got so grainy so fast, it was really hard to shoot at a higher ISO than 1250, which is not even that high. So I always ended up using an off camera flash if it got slightly too dark. And it worked. But I love natural light and the camera I own now allows me to shoot at dusk using all of the pretty and moody very last light of the day. So if you are considering buying a DSLR camera, one of the first things I would ask is how far can I push the ISO before the grain becomes unbearable? I didn’t know that when I started out and I wish I did. Because a camera that does well in low light settings is a solid investment.

How to retain all of the beautiful colours and details in the sky, especially when shooting at sunset
1) Shoot dark – the sky is a highlight and will be blown out if you expose for the people you are photographing which always appear darker. So take a photo that seems too dark at first.
2) You can use a flash to brighten up the people or use natural ambient light depending on the range of the device that you are using.
3) Do some basic editing. Open your RAW files in Lightroom or Photoshop. Or if you took the photo with your phone, click on the editing tool and apply these basic changes:
🔸Highlights – bring them way down (darken them), it will bring back more details and colours in the sky
🔸Shadows – Brighten up the shadows, it will make the subject brighter
🔸Contrast – add contrast because brightening the shadows will make your image look more flat so you need to compensate with the contrast
🔸 Blacks – you can also darken your blacks to add more presence and also help compensate for making the shadows brighter
🔸 Saturation/vibrance – you can increase it a bit to make the colours look more vibrant, but don’t overdo it or it looks cheesy
Voilà! Just a few easy steps to turn even a cell phone photo taken during a beautiful sunset into a masterpiece! I included a before and after shot for you to see the difference. I also like warming up the tone!